In the past couple of issues, Doug has been doing a credible job of explaining heat, race fuel, and the likes. I’ve enjoyed what I’ve read and this has compelled me to add my two cents based on my past racing experience with RD-350’s.
BY DALE ALEXANDER
When I started racing RD’s, the fast guys on the west coast were Alan and Dain Gingerelli, Dick Fuller, Scott Clough and Bob Tigert. They were fast at tracks like Sears Point, Riverside, and Ontario. I was just a wee pup of eighteen and had a lot to learn. By the time I left racing, it took Yamaha’s then-latest creation, the FZR 400, to make my fifteen-year-old RD-375 obsolete. What I mean by obsolete was that I had been relegated to finishing 7th with six FZR 400’s in front of me. Not wishing to spend $5000 to ”purchase’ trophies, I hung it up. What’s important here is the fact that I would very much like to pass on the knowledge that I have accumulated during all those years and as Doug has more or less started the ball rolling with his articles on heat, I see no reason to break stride.
Way back when Mt. Everest was a foothill and two-strokes only came in one, two or three cylinders, companies like Denco Engineering and Hot Bike Engineering were running Kawasaki triples regularly at Fremont Dragstrip. Tony Nicosia would run the Kaws all the way down to the end on the back wheel, severely stressing the wheelie bars. Quite a sight to behold. And when the bikes were brought back to the pre-staging area, a curious ritual would begin. Out came the pressurized water sprayers to hose the cylinders, heads, and cases off. Some wise-ass would invariably make a comment like ‘It doesn’t matter how much they water them things, they ain’t gonna grow any faster.
My own experience with road racing was just beginning to develop. I was soon to observe that the RD would run pretty strong in 6th gear out of one corner, only to be reduced to 5th gear and finally 4th gear by the end of the race. The engine was consistently losing power as the race progressed. Something was overheating, BUT WHAT? Suzuki had Ram-Air heads on their 380 and 550 triples, after-market water-cooled heads were available but even the factory water pumpers were having a like problem so what was the point?
To make matters really confusing, all manner of porting ideas were being tried, but everyone was going pretty much the same speed or slower. So it would seem that whatever the problem was, it was related to heat, the development of power, and the amount of time that the power was being used.
At this time, in the mid to late 70’s, the state of the art for porting and compression was pretty much in its infancy. Raise the exhaust port to 28 m.m., trim .020″ off the head, add some richer jetting, and let’s go racin’. This yielded a moderate increase in power and compression which, if checked by a gauge, was about 150 p.s.i.. As my quest for knowledge grew and my desire to extract reliable power increased, I started looking down other avenues to expand my understanding of what was needed to make heaps and heaps of consistent power. A not-so-obvious place to look turned out to be car racing. Even though one might at first think the four-stroke engines have little in common with two-strokes, I was soon to prove myself wrong. With the exception of how gases move in and out of cylinders, both designs are plagued with much the same problems, and the first lesson I learned about heat and how to control it led me to investigate quench bands or squish bands as they are known to us.
The squish band is the area along the outside edge of the head that is more or less flat or matches the angle of the crown of the piston closely. Its purpose is two fold: 1) it acts to create a mixing of the charge as it is compressed by the piston. This helps to make a more homogeneous mixture that burns faster with less ignition advance. And 2) when properly set up, the squish band acts to cool the charge and the end gases to help eliminate detonation. This is the really important aspect of the squish band as it relates to a two-stroke.
It acts to cool the charge. Weren’t we just wondering where all this damaging heat was coming from? Ive looked at a ton of pistons and noted early on that a lot about heat can be learned by turning the piston upside down and looking at the area under the crown on the inside of the piston. Good running bikes had a very light brown color that was glossy. Better running bikes had a much larger area that covered the entire underside of the crown and was much darker in color, but still glossy. On bikes that didn’t run that hard, this area had turned flat black.
This is perhaps one of the best areas to keep an eye on the heat health of an engine, so it’s important to understand what information has been given to us here. Oil, whether in a four-stroke or two-stroke, is being churned up by the crankshaft and is being thrown against the underside of the piston crown. The heat of combustion moves from the chamber side of the piston crown to the underside as the piston tries to rid itself of the heat before melting. It is the presence of this heat that bakes (or burns) the oil onto the underside of the piston. A little heat, a small light-colored area. Too much heat and the oil burns carbon black. A very useful indicator indeed.
But a function of the heat that is unique to a two-stroke is that the worst of its effects is yet to be felt. When gases are heated they expand, and if the container that they are expanding into happens to be sealed, pressure rises. Well, isn’t the crankcase of a two-stroke sealed for the time needed to build pressure to start the scavenging cycle? Yes and here’s the rub. As the piston crown grows hotter, the underside radiates this heat into the crankcase, increasing the pressure to such an extent that when the intake port opens, the pressure inside the case is momentarily higher than that of the incoming charge, and everything stalls for a brief moment: brief for all things but the engine. It WILL NOT fully charge the case and as a result, the next scavenge event will not fully charge the combustion chamber and the engine is now not developing the power it did when things were cooler. Hence, Tony Nicasia waters his bikes to try and battle this problem externally.
What can be done to take care of this problem internally can best be summed up by understanding some of the nature of combustion and the physical properties of the engine. This would be a good time to glance at Figure 1. This drawing represents to the best of my memory a cross-section of an RD-350. It could be any engine actually. It should be fairly easy to make out the cylinder, head, piston, gasket, bolts, etc. The boxed-in area is the area that I wish to spend sometime talking about ’cause this is where all the problems regarding heat begin.
Figure 2 is a blow-up of this area so move along and be quick about it! Along the left side of Figure 2, there is a darker area that corresponds to the head gasket. On an RD-350, the gasket is .040″ thick. The step just above the gasket represents the .020″ step that one will find in stock, unmodified head. Together, these two figures add up to a value of .060″. Keep this in mind, because these very small values will become VERY important in a moment. For future reference, this .060″ is properly known as piston/head clearance and will be called such.
Figure 3 shows an additional dark area that encircles the combustion chamber. This shaded area represents all the area of the head, piston crown, and cylinder wall that is exposed to the heat of combustion at T.D.C.. I like to call this area the “boundary cooling layer” area. Please note as well that I have given a value of 1000 degrees to this layer. For sake of argument, let’s say that the fuel gets into trouble (detonation) at any value greater than 1000 degrees. This is not the true temperature involved here, but for ease of arithmetic, let’s keep the numbers round. The real numbers aren’t important, just the concept. This boundary layer depicts the physical effect that occurs when hot gas is in proximity to a cooler object: the combustion gas is cooled by the presence of the cooler head, piston, etc. By experimentation, I feel comfortable saying that this layer is usually no thicker than .020″. As the piston has a boundary area that is .020″ thick and the head is .020″ thick as well, it doesnt take a rocket scientist to see that the area between the two cooled surfaces is .020″ thick AND is uncooled by the boundary effect!!! This is the area where the problems with heat start.
The combustible gases all the way out to the left side of this area are known as end gases”. When the gases in the main portion of the chamber are ignited, several things happen at once: 1) the spark starts the actual chemical reaction that is combustion, 2) the temperatures and pressures build quickly, 3) the flame front moves rapidly away from the spark plug. As the flame front moves to the end gas area, pressures rise quickly even though the piston is descending. At some point, the pressures and temperatures are great enough that the end gases will spontaneously ignite. This is known as detonation. When the end gases ignite in this fashion, the pressures in this area grow to tremendous values leading to piston fractures, hydraulic-type stress failure of small and big end needle roller bearings and other not-so-nice things.
Detonation can be inaudible what all with the racket that the intake, exhaust, piston slap, and ring flutter can make, so damage can be occurring and pistons overheating without any warning to the rider. Assuming that the ignition is timed to a reasonable value and the octane rating of the fuel is sufficient for the use the engine is seeing, one of the only other things that can be done to reduce the possibility of detonation is to reduce the piston/head clearance to .035. That way, the boundary cooling layers overlap and all end gases in this problem-prone area should be reduced in temperature to a level below the “auto-ignition” point. When this happens, the piston crown is no longer heated to such an extreme extent, and the charge in the crankcase is reduced in temperature reducing the pressurization and allowing a more complete filling, and the power goes up and stays longer as a result.
Looking back to Figure 3, note once again that the boundary layers are .020 each and the clearance between the layers is .020″ as well. If one removes the step in the head which is approximately .020, the piston/head clearance will be down to .040″ but my experience has been that .030″ to .035 works the best. I think Ill let you all stew on where to lose that other .005″/.010 until the next issue. But rest assured the wait will be worthwhile as I’m just beginning to scratch the surface of go-fast stuff. See ya soon!
Where Were We?
Hi all! I Hope Christmas was good to all of you and porting tools, lathes, and mills were waiting for you under the X-mas tree. The main points from the first article were to identify the source of heat-related power loss in a two-stroke engine, to identify the cause, to define what the squish band is and how it works, to identify what the physical effects are and how to spot them on a piston that had been in service and to propose a solution to remedy detonation and the heat that accompanies detonation. I also left you with some homework.” In order to reap the benefits of a properly working squish band, I asked you to think of a way to remove an extra .005-.010″ after all the easy solutions had been done. Homework is now due!
As we were looking for our solution at that time (1980’s), we were also experiencing head gasket leakage that was proving to be a problem to solve. We were torquing the head in several small steps, lapping the head, and any other manner of preventative maintenance that we could think of. We had the best luck coating the head gasket ring with the spray Copper Coat that one can get in an auto parts store. This was the longest-lasting solution. Even though, after 10 races or so, a tell-tale weeping of oil was found at the gasket area. The only reason that we could think of involved the design of the RD350 gasket and the fact that material had been removed from the head when it was cut to up the compression. We felt that the removal of the metal had reduced what could be called the “I beam” section of the head. This refers to the fact that if the head were to be sawed in half vertically through the head bolt holes, one would see a definite thickness to the metal. Any reduction of this material would weaken the head’s ability to resist deforming from a straight sealing surface. To make matters worse, the very design of the head gasket, although probably chosen to increase sealing pressures, was promoting the bending of the head as the bolts pull the head down away from the gasket. Think of a 12 ft. long piece of 2×4 resting on a brick and then have a person stand on either end to help get a mental picture of what was happening.
Fortunately, a solution was already available in the form of the RD400 head gasket. Apparently, Yamaha may have noticed that the 350-style gasket was weak in this area and had updated it for the 400 series. The C-D-E series gasket was simply a .020 sheet of copper that had a much greater surface area, encircling the head bolt holes and protruding out between the head bolts. This helped reduce the “brick and the board” problem. All that was needed to bring about this change was to lathe the top of the barrel until a smooth surface for the gasket was made and to add a couple of “pips” for what the 400 gasket uses to locate itself to the barrel. But we originally only wanted to remove .005-.010″ and the change from the 350 gasket (.040″) to the 400 gasket (.020″) reduced the squish by .020″. This was .010″ too close for comfort.
Well, now we need to put .010 of the step we had originally removed way back when back into the head! This is the nature of experimentation. One change here adds up to two changes somewhere else. But this could be done as we already had the tool that we used to turn the heads in the first place. There is only one area to worry about that may not be so obvious: be sure that the OD of the step is great enough to accommodate the largest bore you expect to use. At the time, 65mm was the largest bore the bike would probably see, so the OD was set at 65.25-65.5 mm. The final form of this step would best be shown by figure 4.
Note that the two boundary layers we talked of in part one now overlap as represented by the darker area circled. This is what a squish band is supposed to look like. The charge that clings to the piston and head surfaces are cooled to below the auto-ignition point and the charge is being squished” back to the center of the chamber in a turbulent, fast-burning mixture. By closing things up like this, detonation is reduced and the underside of the piston will once again begin to reflect the reduction of heat being pumped into the crankcase. Of course, if there is a reduction in heat below a useful point, couldn’t we once again up the compression to take advantage of this? Yes, but we’re getting ahead of ourselves now.
The tool needed to turn the head is shown in Figure 7, Cylinder Head Turning Tool”. The proper sized solder to check the squish clearance is 22 gauge, which is about .039″ thick. A dab of grease in four places on the crown of the piston is used to hold the solder in place. I like to use the four corners next to the head bolt holes. The piston should be about 10 mm down from the top and the solder should be about 15 mm long. Bolt the head onto the barrel. When everything is in place, turn the engine over with the bolt that holds the alternator rotor on. You should feel a slight drag as the solder is crushed. Remove the head and remove the solder being careful to note which piece came from what place. When you measure the solder, you may note that something is not right: The pieces that were close to the exhaust side may measure .040 and the pieces that were close to the rear of the cylinder may measure .020″.
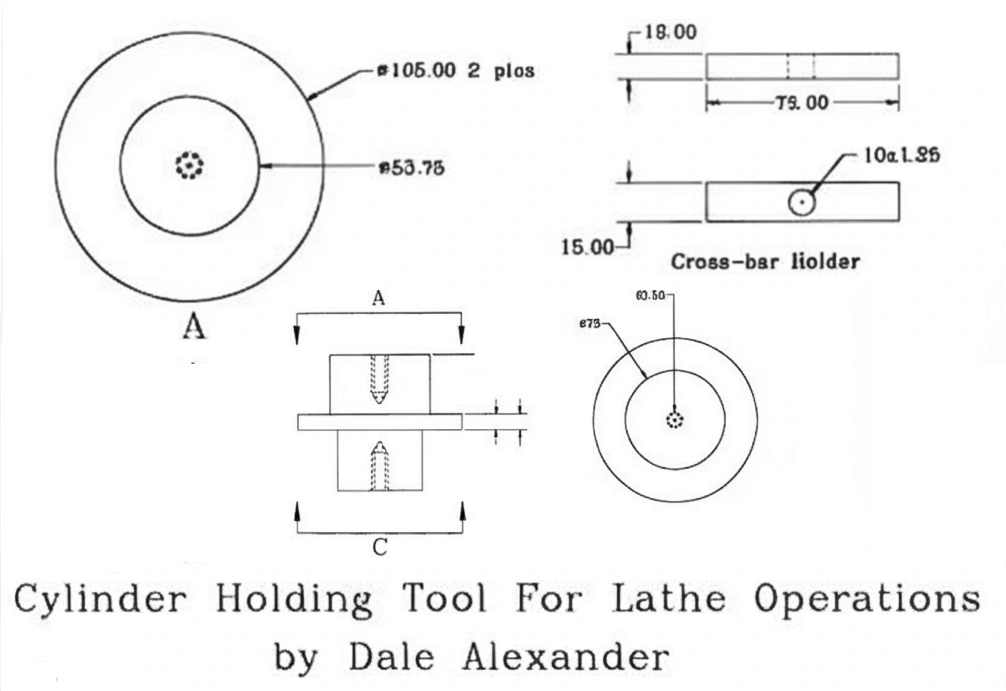
Now What’s Going On!?
What’s going on here? Didn’t we just go through all these flaming hoops to figure out what all had to be done to get to .030? And now we have two DIFFERENT measurements!? Ahhh! That was on paper and we have just stumbled onto another of the RD series’ design flaws. Put the head back on loosely and see how far it will move front to back. Quite a bit, yes? By doing this, aren’t we also moving the squish band closer/farther away from the piston? Indeed we are. What we need is some way to locate the head to the barrel and keep it centered as well. Not a problem. Look at the second tool drawing and note that it is a “Cylinder head, Centering Tool”. This tool works by locating the head in relation to the spark plug hole and the barrel. The hollow set screws are set equal to the bore size and then the head and the tool are placed into the barrel and tightened up.
Now the head is centered. Use a 1/8″ “gun drill” which is simply a very long drill bit and drill down between the fins through the head and into the barrel. Don’t go more than about 5-7mm, you just need enough to hold a dowel pin. Do this twice for each head. Don’t be concerned about being exact. You don’t want to be close as this will ensure that the head is a custom fit for its barrel and it can’t be swapped accidentally with the other. A 1/8″ dowel of any type can be used as a locating dowel. Glue it to the barrels so it won’t be prone to falling into the engine when the head is removed. Bolt everything back up with the solder and NOW the clearance readings will be more consistent front to back. Adjust clearance as needed!
Well, now we’re getting into some good stuff! In the next part, I’ll introduce you to yet another tool for engine work as we are going to tackle this problem from another side. In addition, I will be getting into some ceramic coatings for cooking. Straight away, not pot roasts! Enjoy!!!
Almost finished now…
Well, we’ve got a motor now that runs better than most others out there and all that we have done is close up the squish clearances to a proper value and eliminate a bothersome head gasket leak. Is there anything else that can be done? Yes, there is an even easier method of sealing the head.
After using the RD-400 style head gasket for an extended period of time, something on the order of a season of racing (in California at the time, this was 18 to 20 races), it was found that the 400 gaskets would begin to leak too. And servicing the head/barrel/gasket was a bit of a bear as the hardened copper coat was difficult to remove. I was also racing a TZ-250D at the time and noted that the silicone rubber O-rings did a very good job of sealing the water jacket and the combustion gases on the water pumpers. The TZ-750 had the same setup only for a 66mm bore. Boy, that’s really close to the RD bore, especially if one is using 66mm pistons in the race engine. I discussed the idea of using the TZ-750 inner sealing O-ring with a friend of mine who was also racing RD’s as well. We didn’t know if the ring would stand up to the heat of an air-cooled engine but at times, the only thing one can do is just go ahead and try something. After all, what can happen? An instant seizure? Racing is full of that stuff, so no big deal.
So the decision was made to go ahead. As far as I knew at the time, no one had used an O-ring for the sealing of an RD before, so now we were in new territory. A new tool had to be devised that would hold the barrel true enough to allow the barrel to be turned on a lathe to cut an O-ring groove. Figure 8 shows what was used for the tool. The tool was just barely smaller in o.d. than the 64mm stock bore and could be shimmed up to match any other bore that was used for piston oversizes. The opposite end was made to be used for the 54mm bore used on RD-250s so that any cylinder in the most popular RD sizes could be trued up. The larger step is where the cylinder rested while a Tee bar inserted into the transfer ports and screwed down into the tool held everything together.
Figure 9 shows what the tool looks like installed and ready to turn the O-ring groove in the top of the barrel. The tool could also be inserted into the top of the cylinder to first true the spigot of the barrel so that the head surface would run true when the O-ring groove was cut. The tool could also be used to true up the base gasket surface if it was really knackered. This would help to promote a good bore job as the base surface is the part of the cylinder that boring bars use to find the centerline of any hole.
Figure 10 shows what the tool looks like installed and ready to turn the base/bottom surface or flange of the barrel. Oh great! So now we’re going to run an O-ring and this combination will eliminate yet another gasket. But now the step in the head has to be an ADDITIONAL .020″ deep. Remember what I said about the nature of experimentation? One step forward…two back. By now, one full millimeter of the gasket has been pitched in the circular file never to be seen again and the head is beginning to pick up a sizable step in it again. Fortunately, this is not a major concern because the dowel pins are now holding the head in the proper register as never possible with a stock set-up.
The O-ring groove dimensions have to be adhered to very closely as they will affect the way the O-ring performs and the best place that I can suggest to get the proper values would be any bearing house. All offer O-ring materials and because of this fact, they can help with the proper size of the groove. Just measure the TZ-750 O-ring and use a bearing house size that is as close as possible. This should do the trick nicely. One other caveatyou may have to grind your own tool bit to use. If this sounds like it may be a little over your head, take your local machinist out to lunch to soften him/her up before you ask for this favor! One last note: after setting up the engine like this, I never suffered a leak in this area or had to replace the head gasket again. Good stuff.
Now We Start To Cook
All right! The squish is good, the compression is up, the head gasket doesnt leak, and the bike runs HARD long into a race. What ELSE can be done? I like to mention to people that if one would like to see what the most current state of the art in engine technology is, then look to auto racing. This is true because a lot of very sharp people race against each other every weekend for a lot of money and this tends to bring the best ideas to the forefront quickly (and believe me, the best ideas out in the bike racing world are dated at least 5 years). One of these ideas in the early 80s was Heat Barrier Coatings: Ceramics.
I learned of ceramic coatings one evening in the shop of Harry Hunt’s Racing. Roland Cushway was inspecting the top end of the shops TZ-250. Peeking over his shoulder I noticed that the crown of the new piston going in was green. When asked, Roland explained that the company that was coating their aluminum brake discs was trying out ceramic coating in hi-heat applications and that Roland was playing around with them on the pistons. He felt that they were allowing higher compression and that the engine was running harder at the end of the race. This, of course, was true as the coating was reducing the amount of heat that was passing through the piston into the case as we have previously talked about in this article. He had also observed that the coating nearest the edge of the piston was prone to cracking and he didn’t know if it was from detonation(which had become harder to read on the coated piston) or if the piston was rocking in the bore allowing the coating to contact the cylinder slightly and shock it. Ceramic coatings are very tough and difficult to machine, but they don’t stand up well to impact of any kind.
The coatings that Roland was using, as well as some of the popular coatings today, are generally .005″. This seemed like a very thin layer of material for the amount of heat it was being asked to insulate the piston from. I sent my pistons along to Roland’s company for coating. When they returned, I removed the coating from the edges of the crown as Roland had suggested in an attempt to reduce the cracking problem. I checked the squish clearance and found once again that the step in the cylinder had to be modified(here we go again!). After running the bike for a practice day, the pistons were removed and the underside inspected, and lo and behold, the dark area under the crown had been reduced in size just as I had hoped for. There had been a reduction in heat to the piston! We reduced the volume in the head to increase the compression pressure and went racing. Running harder-longer. Perfect.
About three years after this revelation, I found a new business in the local area that was offering ceramic coatings. When I spoke with the owner, I discovered that his previous job was with United Airlines and that his specialty was the application of ceramic and plasma coatings. I explained what we were doing and his response was that the ceramic coatings that we were currently using were not the proper choice for our needs. He took the time to make sure that I understood that although the .005 coating would provide some minimal gain, the proper coating was a three-step process that was .020″ thick. The need for three coatings was due to the fact that there wasn’t any one coating that would stay physically attached to the piston as the crown grew from normal expansion. The most likely result of the combination that we were currently using would be that the coating would crack and possibly de-laminate itself from the crown. Hey! Wait. Isn’t that what was happening to the coatings that Roland was using? Boy. This guy was right on the money.
He explained that the first of the three coatings would grow with the piston while the second would grow at a rate more or less between the first coating and the top coating which was thermally stable. Think of a three-piece pyramid with the crown growth represented by the broad base and the stable top ceramic coating represented by the apex. This should help you see what was being explained to me. After more modifications to the head, the combination was run and was the final culmination of all that was done in this area. When used with the 375-long rod combination and the proper porting, along with coatings in the exhaust and intake ports, the engine ran several six-hour endurance races as hard on the last lap as it did on the first.
It pays to understand what you are getting when you are looking around for power. At the time, Roland was up-to-the-minute given the info that he had. A few years later, when the technology had advanced, we could figure out what was happening earlier. Hindsight is always 20/20. When you’re out on the edge and playing around, you find out quite often that changes affect all kinds of things: assembly clearances, reliability, heat, power, etc. In the mid ’70’s, 150 psi compression, 18.5 cc heads, and power fall-off were the norm. At the end of the ’80s, 175 psi, 20.5cc heads and power all day long was the result of looking around and playing with things. I don’t know who said the more things change, the more they stay the same. In this history of the RD, things couldnt have changed too much more. Enjoy!!
Note: This series originally appeared in a series of articles in the US-based Antique Air-Cooled Yamaha Two-Strokes club newsletter. It has been translated into HTML and credit goes to the author and original publisher.
Download several useful manual files in PDF format for many two-stroke engines/models.
Consider buying me a coffee if you enjoy the content shared with you.
© Copyrights by RD350.info | Torque-Induction. All rights reserved.